Saturday, 7 December 2013

Week 13 - 8th of December - Rendering the models

This was the most relaxing part of the project.  The BPR tool in Zbrush is a fairly new system which allows you to render out different passes of the figure and compose them together in post using a programme such as photoshop.  In this case I rendered out an ambient occlusion, shadow, master beauty, a mask, and a depth pass.  My favourite pass to play around with was the depth because it allowed me to play with the lens blur effect in photoshop, giving some good realistic results.

I used a matcap shader with a clay finish and applied it to the models.  I wanted the eyes to stand out so I applied a basic material 2 shader to that. This gave the eyes a more shinier feel to it.  Ultimately I wanted the renders to look like they were clay sculptures and I was pretty happy with the result.

To present the models I also sculpted something more realistic as a base for the models to stand on besides the usual box or cylinder.  For the female I wanted something to accompany her sexuality, so I thought a silk cloth would be good for this.  For the man I wanted something heroic and manly.  This got me thinking about creating sky scrapers, however I wanted something simple so I just sculpted a rock.  This still proved effective in my opinion.

Overall I was pretty happy with my success with this project.  I learnt alot about the way the human body is shaped and sculpted and drawn.  I wish i could name all the muscles off by heart but I would probably be able to name a handful at most.  However whats important is that I know, at least, sub consciously, how the body looks, and have a deeper appreciation for it.  The names of each muscle will come in time.

The last few weeks were, admittedly, rushed to an extent.  I ended up having to fit in 3 weeks within one week, however it proved pretty achievable as I tend to work more efficiently near the end of tri.

The female figure was not a part of the original weekly tasks, and it is something that I do not regret doing.  Doing the original plan meant doing 3 male poses, and this would just be exhausting after a while.  Sculpting and posing the female was a refreshing experience and rejuvenated the project for me in a sense.  

I hope you all enjoyed my journey to discovering the human body and I will try to keep updating my progress with things that I continue to learn along the away.


Week 12 - 8th of December - Posing the female figure

This week was again an enjoyable one as I got to pose the female figure in any pose I found appealing.  This again meant gathering a lot of reference imagery.  At first I was going to take the male figure's pose and transform that into a female form.  However I really wanted to show off the femininity of the woman.  So I looked at models and superstars and got a bit lost in the process :)  

After about an hour of researching I found a pose which suited my purposes and got to work.  When posing this character I really wwanted to focus on my speed and took less care in getting everything perfect.  It took my 4 hours to pose and fix the sculpt to the point you see below.  Unfortunately I do not have a video showing my process but it was exactly the same as the male figure, using the transpose tool.

Next time I will be rendering my characters.  I would like to use keyshot however I do want to keep the project entirely in zbrush so I would probably end up using zbrush's BPR rendering tool.  Hope you guys like it.

The female figure posed

Side view

Side view

Back view


Week 11 - 6th of December - The female figure

The female figure

The female figure was surprisingly easy to sculpt.  This was due to the fact that I spent three quarters of the trimester studying anatomy and sculpting it.  So when adjusting the male figure, all I had to was look at reference of the nude female figure and adjust it accordingly.  Like any endeavour, I began with a fair amount of anxiety.  However with the incredible amount of resources available, I was confident that I would be able to complete this task.  

To get the female figure into a sense of believability, I had to bring down the muscle tonality a fair bit.  This meant using the clay tubes/clay build up with low z-intensity to fill in the recessed places of the mesh.  This meant the muscles would be filled in, giving the impression of the fatty deposits of the human body.

The one thing I wasn't entirely happy with was the hair.  I may actually change the hair when posing because for some reason all I could see when sculpting the hair was the male figure.  

In addition, I had difficulty with sculpting the female legs.  I had to really go in from a low subdivision and shape it out and then in higher subdivision levels create the bony landmarks I wanted.  I got a bit confused as to whether this girl was a fit girl or a little bit chubby.  

Below is a video of my sculpt.  Next time I will be posing the female and finally finish this entire project by rendering out the male and female figure.


The female figure

the female face close up

No hair


Week 10 - 28th of November - Posing the male character

Posing

The first thing I thought about when posing the character was what pose I actually wanted to do.  I was thinking about a fighting MMA type pose so I began my research to find a pose that I found appealing.  I then compiled it into a combined picture to make it easier when sculpting as shown below.

Reference images

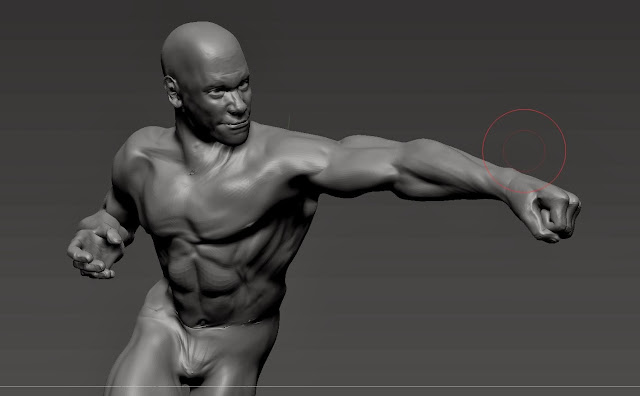
I then took to moving around the mesh.  The tool I used was the transpose brush in Zbrush.  I would first mask out the arm for example, and then use the transpose brush to draw a line from the shoulder to the tip of the fingers.  I would then use the rotate function of the transpose brush to rotate it into place.  This in turn got it roughly into the pose I wanted it to be as below.
The basic pose

I then had to fix it up because in certain parts the mesh deformed really badly.  This meant going back to lower subdivision levels and doing a smoothing pass on each level up.  It was a bit time consuming, however I got a result which I really liked.  I went a bit overboard with the detailing and in the process made him a bit bulkier then I would've preferred.

The pose refined with hair added

Next time Ill be trying to change the male character I sculpted into a female which should be exciting.  It'll be the first time Ill be sculpting a female character so I'm not sure whether It'll turn out good or not.  However I am confident in my skills as a sculptor.