Wednesday, 30 October 2013

Week 7 - 30th of October. The arms

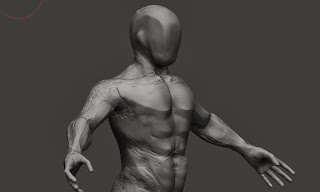
For the arms I was able to sculpt it in alot of detail, even close to the escorche model provided in the digital sculpting book.  However for a more aesthetically pleasing look, I smoothed it down with the clay tubes with low z-intensity and the smooth brush with a low curve.  This meant however that alot of the muscles that I sculpted were lost in the overall sculpt.  However the end result was a more convincing look.  

I started by sketching in the deltoid and biceps, and then moved around the back to the triceps.  The tricky part with the biceps was creating the 3 heads of the tricep muscle and having the deltoid wrap around all 3.  I then moved on to creating a tendon that holds all three muscles together.  

The forearm was by far the most challenging as it is made up of many muscles the way they wrap around the arm.  

The elbow is composed of several bony landmarks.  The main one however is the elbow itself which runs down to the ulna.  The other two are the lateral and medial epicondyles.  The forearm muscles can be simplified into two triangular shapes.  From the back of the arm, you can see the extensors, on the front is the flexors.  Together they radiate out from their insertions and curve around the forearm.  The ulna bone serves as the dividing line between these two groups, the flexors and extensors.  

I also always checked the sillouhette in flat colour mode to get the angle of the highest crest in the top and bottom profiles of the arm muscles.  I also rotated the arms to give a more relaxed look to the body.  Next i'll be focusing on the legs.  

I'm also experimenting with different shaders and rendering which gives a different look and feel to the sculpt.  Below is the video for the sculpt.


Arm from the back

Arm from the front

Top view

Render with different shaders


Tuesday, 29 October 2013

Week 6 report - 23rd of October. The Torso

Muscles of the front torso

I began by making some general changes to the gesture sculpture i did in week 4.  I also tried to give him a more heroic stance and appeal to his torso.

I first sculpted in the pectoralis by using the clay tubes and just etching in horizontal lines on the chest. I made sure to insert the clavicular head at the top of the pectoralis.  

The abdominal muscles were next and again i used the clay tubes brush with no alpha to sculpt in the soft forms of these muscles.  I'm taking advantage of the fact that if i want to smooth something it is better to do it at a smaller subdivision level rather than a higher one.  

I also realised that you can adjust the smoothing curve of the smooth brush.  If you bring the curve down, what this does is reduce the smoothing the brush does, therefore if you've sculpted in alot of detail but still in rough form, the smooth brush with a lower curve will smooth only the highest surface detail, leaving nearly all the sculpted detail still in but with a smoother look which is what i wanted.

Muscles of the side torso

On the side of the abdominals is the external obliques and serratus muscles.  All these muscles inter-connect with eachother, so as i was sculpting each one at the very end I had to go back in and fill in the gaps so as to make it seem as though they were doing this action.

Muscles of the back torso

The back was a bit more complex as it has the greatest number of muscles visible.  I started by re-addressing the trapezius muscles, sculpting in where it connects to the lattissimus dorsi muscle.  The lattissimus dorsi wraps around to the obliques.  To the left and right of the trapezius muscle are the rhomboids.  At the end i started to think of the arms and therefore sculpted in the deltoids or shoulders, but this will be addressed later. 

Overall I am always moving back and forth between weeks, constantly addressing the face and overall structure of the body.  I hope to bringing the sculpt up in detail rather than concentrating on one area at  a time.

Below you'll find a link to the sculpt timeline as well as a few pictures outlining the different muscle groups and skeletal landmarks of the body.


Front

Back

Side

Week 5 report – Friday 18th of October. The face and neck muscles


The Head and Neck.
To sculpt the neck and head, I start by sculpting the form of the skull on the basic shape.  From there I addressed major bony forms of the skull and how they influence the face.  I also thought about how certain muscles influence the final fleshed form. 
I addressed the neck in the same way.  Starting by sculpting the major muscle forms and where it connects to the torso ie. The spine of the scapula and the clavicles. 

The skull
Representing the entire bony structure of the head, the skull consists of serveral distinct parts.  Dividing this up into two major shapes, the cranial mass and the facial wedge. 

The cranial mass is the cranium, the protective casing of the brain.  The facial mass consists of the eye sockets, zygomatic bones, maxilla or upper jaw, and the mandible or lower jaw.

I will be taking a escorche technique to sculpting the face.  Escorche is French for flayed and is a layered approach to sculpting.  I will start by sculpting the skull, then build muscle and fat and skin.  

As I sculpt I am using measure guides provided by Digital Sculpting in Zbrush to help place the features of the skull.  I begin by sculpting the major landmarks ie, the eye sockets and nasal cavity. 

I then move to sketch in the zygomatic bones, making sure to get that zig zag look as it wraps around the face.

I then rough in the jawline, adding negative space for the muscles that will be sculpted in later.  I constantly switch to silhouette ie. Flat colour to adjust the shape of the skull.  I then sculpt in a hole for the mouth and then pull the two ends together. Below is a sculpt video of it

http://www.youtube.com/watch?v=8ptnZQG26Wg&feature=youtu.be

The muscles
For the muscles I used the rake brush and clay tubes with the basic red material applied to give the model a nice colour to the muscles.  I basically followed the pictures given on human anatomy for artists as well as the tutorial to mask out the basic shape of the muscle and fill it in with the rake and clay tubes.  To view this sculpt click here


The overlay of skin
Refining the surface meant bringing the model back into a basic material, and then using clay tubes with no alpha and low intensity, and the flatten brush, I was able to put in the fatty tissue and skin of the human.  The challenging part was trying to give the model a smoothed look but not too smooth as to lose some of its realism.  This was done by going in different passes.  The ear was also challenging as I was constantly trying to both get it looking right as well as stay true to its anatomy.

The final face
The biggest challenge overall though was the eye lids.  I spent hours just on shaping the eyes and seeing how light would catch and make shadows.  I made huge improvements on just taking the time to sculpt and shape these.
Final face before fixing up eye lids

Final face front
Final face 


Week 4 report – Friday 11th October. Gesture and masses


To create this form, I had to focus on the different plane crests of the body ie, the flatness of the chest or the side of the leg.  The plane breaks ie when the chest moves onto the abdominal muscles. And the profile of the way body looks in silhouette form.  

This week I focused on blocking out the general form of the character.  I started by sketching in the torso masses by quickly blocking in an oval shape for the torso and a box for the pelvis.   The torso is made up of three movable masses; the cranial mass, the thoracic mass and the pelvis mass.

The legs was the next thing.  Here I quickly sculpted in an oval shape for the muscle groups here.  The legs are made up of interlocking muscle groups but for this part I was only concerned with the most basic shapes.  

The main brushes I used was the clay tubes to build up form, the move brush to get the silhouette right, and the standard brush and inflate brush on the fingers to give it more shape.  I also used the rake brush to fill in areas.  The smooth brush was used with a low intensity to reduce the bumpy look that artists usually find themselves in. 


I constantly checked the silhouette of my figure to make sure that it looked right at all angles.  You can turn perspective on and off in Zbrush as well to get different views.


Sketching in the torso
Sketching in the leg masses
the sillouhette of the arms

constantly checking the sillouhette

I ended up creating 2 gesture figures and 1 planed figure to really get a sense of the human figure in its basic form. The next step is focusing in on the different parts of the body.  Below is the final gesture figure.


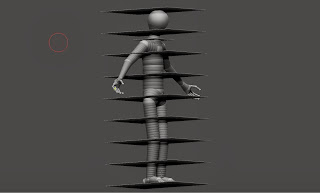
I also did a planar analysis on the figure, focusing on using the pinch and flatten brush to create show the different plane changes, and breaks on the model.  This helped me realise how each muscle is formed and wrapped around the body


Monday, 28 October 2013

Week 3 report – Friday 4th of October. Blocking the mesh

Week 3 report – Friday 4th of October
Zsphere mesh
I created the zsphere mesh on the basis of 8 heads high.  I made sure to hit certain landmarks as below and utilized the measure guides as a tool to achieve this look.

Landmark
Head Measure
Chin
Head 1
Nipples
Head 2
Navel
Head 3
Pubic Bone
Head 4
Lower thigh
Head 5
Bony protrusion of the knee
Head 6
Lower shin
Head 7
Bottom of feet
Head 8


The good thing about zspheres is that you can then use it to create evenly spaced polygons that follow the curvature of the zsphere.  You can then use it as a base mesh for moving onto the next stage.  It was created within a day.  I also purchased the two books aforementioned in the earlier weeks reports


Week 2 – Friday 27th of September. 1000 word proposal


This week I spoke to Jason about my interest and was met with good faith.  At the end of week 1, I ended up purchasing a laptop that would help me work at Uni with Zbrush as Qantm does not have the programme as part of it’s learning curriculum.
At home I continued researching tutorials and books.  I wanted a book that talked about anatomy for artists in a traditional sense, as well as a book that explained digital sculpting.  I found 2 good resources.
-        Human Anatomy for Artists: The Elements of Form by Eliot Goldfinger (Oxford University Press, 1991)
-        Zbrush Digital Sculpting: Human Anatomy by Scott Spencer (Wiley Publishing, Inc, 201

I began typing up my 1000 word research proposal and learning agreement.  I decided to split up the remainder of the 13 weeks into the way the digital sculpting book split its chapters.  Breaking it up into stages, it began by creating a zsphere armature for the base mesh.  Then moved on to creating gesture and the general form into the figure.  Then focused in on each specific area of the body ie. The head and neck; the torso; the arms; the pelvis and legs; hands and feet.  Finally it moved on to finishing the naked figure.  I added another week which focused on clothing, however I may remove that to focus on posing and rendering.  

Week 1 - Friday the 20th of September. Overview of topic


This week I thought about what I wanted to achieve.  I looked back on my previous work to see if anything could be improved upon.  I also thought about what I want area interested me the most.  This helped me narrow down my interest into the area of character modelling.  I began to look at my characters and thought about what could be improved on the most.  This led me to begin thinking about their anatomy.  All my characters were human so it decided to improve on my human anatomy.
 
I began looking online for books and tutorials that would help me discover the best way to represent human anatomy.  The majority of resources told me that the best way would be to sculpt it first and, if for a game, bake that high poly information onto the game res version.

I have been sculpting in Zbrush for about a year now so I am still fairly new.  I quickly decided that I wanted to focus on sculpting rather than create game ready meshes since retopology is a task in itself and is not focused on human anatomy.  Below are some examples of previous work.  .